Category Archives: Love

Live Inspired….Love You….Thank You….Happy Birthday….

Standard

We were at the cabin a few weekends ago and I was in a more CAS mood.  I usually like to distress and mess up my cards…..I went with a more of a clean look and not allot on the cards.  I was on a roll and made a few of them (and I thought I’d save you some email space and post all four of them in one post…..lol):


How ’bout that little pop of orange??  I used one of my swirl stamps which is from a set that I believe was the Martha Stewart swirls set (but I honestly don’t remember for sure) and stamped onto the bottom of my card base with my versamark stamp pad.  (love that stamp pad!!)  I added the word paper strip which is from a Making Memories paper called Brun Antique Dictionary.  I found this 12 x 12 paper in a pack of 25 of the same two-sided sheets and just fell in love with it!!  This is going to be soooo versatile and I know I’ll use it allot (as you’ll see with these cards….lol).  The cute bird pair is from my Inkadinkado stamp set called You are a True Friend and was colored in with my Tim Holtz Peeled Paint Distress Ink.  I also added another swirl to the printed DP which was stamped in Tim Holtz Dried Marigold Distress ink.  The ‘Live Inspired’ was taken from a portion of a Close To My Heart stamp from the set with the same name and stamped and edged in Rich Cocoa Memento ink.

This card also uses that very cool Making Memories Brun Antique Dictionary paper.  The flowers were made from two different stamp sets – one using a stem and leaf stamps from a set I’ve had forever and don’t even know who it’s made by. The flower is from a new set I just got from Stampin’ Up! called ‘Faith in Nature’.  I LOVE this set and I know I’ll use it allot.  I sponged the flower portions with some Tim Holtz Dried Marigold and Antique Linen Distress ink and also inked the edges of the printed DP with the Dried Marigold and some Rich Cocoa Memento ink.  The sentiment is taken from a portion of a stamp from my Hot Off The Press stamp set called ‘Matching Borders & Focals’.  It was stamped and edged in the Memento Rich Cocoa ink.   The lace strip was attached under and was colored using my Tim Holtz blending tool and my Antique Linen Distress Ink.


This was a quick and fun card to put together.  That pear stamp is a new fave of mine from  my Stampin’ Up! Faith in Nature set.  I stamped it onto a plain piece of cream-colored cardstock and inked it with some Tim Holtz Peeled Paint and Dried Marigold Distress Ink and my sponge daubers.  I didn’t like the look of my plain cardstock so I grabbed one of my wooden skewers that I keep in my tool pouch and stamped it into the Memento Rich Cocoa ink and dotted it onto the paper using the flat end and the pointed end for some depth to the paper.  The sentiment is from the same stamp set and inked in the Memento Rich Cocoa.  It was matted a layered a couple of times and I punched a border in some rusty colored cardstock using my Stampin’ Up! Scallop Trim Border punch.  Added some liquid pearls and Taaa Daaa….lol


Okay, so that’s it for a while.  I’m going to be heading to a trade show this afternoon with one of my DIL’s and then I’ll be back to play.  Have a most wonderful day!  Chao.

Huggss,

Yvonne  😉


Love, lavender, lace, layers…..lots of bling!!

Standard

Look out….this is post #2.  Don’t worry, I don’t think I have any more to post tonight.  So, this card is actually for two different challenges that I kinda combined on SCS. For the Alphabet Challenge that the lovely Diane is hosting.  She’s doing a super job and is making each week’s letter sooo much fun by adding all sorts of mini challenges within each weeks letter challenge.  The other challenge is the Mix It Up  challenge that the multi-talented Lauren from the land down under is hosting this week.  Check out her blog for some amazing inspiration and wonderful techniques.  You won’t be disappointed you wandered over.


Speaking of the wonderfully talented Lauren, check out that hat pin on my card.  Yup, you may have guessed, I do believe that little creation came from none other than Lauren from a hat pin swap I was in last summer.  I’ve been hoarding these little treasures since I received them…..I have a whole pin cushion full of beautiful hat pins from all over North America and of course Aussie land!  Anyway, on to the card.  That beautiful lavender flower is actually from our local Dollar Store where you can buy 6 or 8 of these little beauts in a package for $1.50!!!  Booya.  I inked the edges of it with some Tim Holtz Distress Ink in Dusty Concord and then added some Star Dust Stickles to the edges of the petals.  It’s just gorgeous in real life! 


Look at the fancy shmancy edge on the top of the card!!  This was done using a template I got from Paper Wishes called Diamond Folds.  I really like the look of it. It’s just a series of cuts along the fold of the card and then these cuts are folded back onto each other…..the end result looks complicated, but it’s really very easy to do.


The completed card….the embossed piece was sponged around the edges with my Dusty Concord as was the piece with the sentiment. 


At the Alphabet Challenge, Diane challenged up to:

Anything goes – I used the flower and hat pin, lots of bling and the layers.

Be wordy and use a word that starts with the letter ‘L’

Create with Lavender

Dare you to include a lovely accent of lace.

Embrace a new technique where I decided to finally use my Diamond Fold template


At the Mix It Up challenge being hosted by Lauren, her challenge to us was to sew on our card……well I decided to sew in two places.  Around the purple embossed piece of cardstock and around the sentiment.


K, I’m done now…..thanks once again.  Later ladies…..I love hearing from you!!


Huggss,

Yvonne


Bliss…

Standard

Hey there my blog friends!!  I love brown and black together…..I like Kraft cardstock and black together even better!!  This is the third card I’ve made for the challenge I’m hosting over in the Mix It Up challenge thread over on SCS.  Check it out!!  Mix It Up.


I really like this black satin ribbon.  I also love my peg bow maker that I made myself…..very rough variation of it, but it works like a charm!!  Speaking of which…isn’t that pearl charm gorgeous?!  It’s another one of my treasures from Making Memories and their Vintage Groove II line.  I just love these little trinkets and my friend Lynn got me hooked on them when she happened to include a couple of the sets in a package she sent me a while ago.  The background on the Kraft paper is made using my Versamark ink pad and a cute little ‘craft smart’stamp I picked up in the $1.50 bin at Michael’s.  I just stamped it in a pattern on the front of the card and it made this subtle but elegant background for my card.\


Look at this border I made on the card using half pearls, rhinestones and yup…..buttons!!  Again, I saw this border idea in a craft magazine and just had to give it a try!  I really like how it turned out and I think I’ll be using it again.  I stamped the word Bliss, another little treasure I found in the $1.50 bin at Michael’s and it made by Hampton Art and their ‘studio g’ line.  I stamped it with my Versamark and then embossed it with clear embossing powder to make it pop just that much more.  I dotted the I with a half pearl and put a string of bling along the bottom….pop dotted it onto the card, and all done!!


And here’s the whole card.  I like how it turned out and I think it would make a very nice wedding card.   That’s it…..I’m going to drag my butt to bed now…..hopefully the girls haven’t all ran away from the challenge this week!!  Thanks so much for dropping by…..I love visitors and I love reading your comments!!!

Huggss,

Yvonne   😉


Love Birds……ahhhh

Standard

Round three coming up!  This is such a cute card…..I just love all the little details on this one.


Aren’t those two little birds just too cute!!!  They lend themselves to be very fitting for so many different occasions!!  Valentines, a wedding card, anniversary, birthday, just because, thinking of you…..etc., etc.!  So versatile they are.  And I love the embossed frame…..it’s one of the folders in the Designer Frames set of Textured Impressions Embossing Folders Set..  This oval folder fits the Extra-Large Oval punch (which the birds were stamped onto).  I really like the circle details around this embossed frame…..sets it off so nicely.


I love the little hearts!  Now I forgot to ask ‘Cutter’ (my SU! Demo’s nickname….she’s awesome!!) which folder this is, so I went searching through the catalogues and I’m pretty sure it’s one of the Letterpress Plates called Heart Pressed….so I’m going with that.  She’ll correct me if I’m wrong….lol.  (and only because I just emailed her to ask her.  😉  )  Edit:  lol……nope, I was wrong…..it’s one of the folders from the Adorning Accents sets.


See…..cute card isn’t it?!!  Don’t you think my little photo helper is just the best?  It’s a bear hubby gave me quite a few years ago that was attached to a balloon boquet for Valentines Day……there was a story behind me getting the balloons, because anyone who knows my hubbywill know he doesn’t do things like send balloon bouquets….lol.  Attached to the cute little bear was a little card and on that card was a poem he’d written for me.  Now, you’re probably going…..ahhhh…..he wrote you a poem??!!  How romantic……ya.  This is what the poem said:  “Roses are red, violets are blue(which, I agree, was a good start to the poem).  It went on to say….. I need brownie points, for a new Ski-Doo…..yup, that’s right.  LOL LOL LOL.  He’d had a minor argument with a tree root on a ski-doo trail and his sled kinda lost and bent his ski…hadn’t told me yet, so he thought this would be a good way to break the news to me…ya gotta love the man.  He is inventive….and it totally worked!!  Yup, that’s right, I can be bought with a sweet little bear holding a sign which says “I love you this much” and a balloon bouquet….lol

 That’s it for tonight…..I’m off to make an important phone call to a special friend……thanks for stopping by and checking out my cards!  I soooo appreciate it!!

Huggss,

Yvonne    😉

Trying to get back in the groove!!!

Standard

Hello my long lost blogging friends!!!  I was away on a holiday to Hawaii and oh my goodness!!!  Beautiful is all I can say!  It was our first time there and it did not dissapoint.  I took a TON of photos and I’m hoping to sort throught them this weekend and I’ll post some of my fav’s for ya!  I tell you, I sure missed this blogging stuff while I was away and I think the next time I go off on a holiday, I’m going to have to try and do some blogging while I’m away just so I stay in the groove…..geesh!!

 So, I’ve been trying to get back in the groove and was playing in my craftroom this evening and did a card up that I still can’t decide if I like or not.  I keep looking at it and thinking it needs something…..I have no idea what that something might be, but I finally gave up…..lol


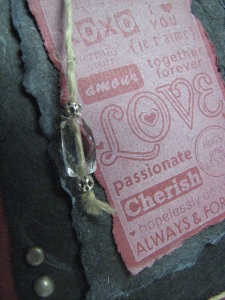
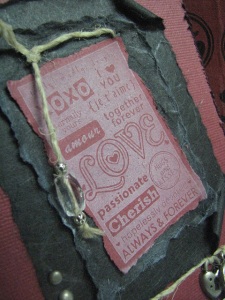
I was playing with some cord and was thinking (as I do actually do that from time to time), instead of making a hat pin to put on the card, why not string the beads onto the cord and use that as one of the embellishments for the card……I kinda like it!!  The stamp is one from a set of four from Inkadinado called ‘In The Words’ and they’re all ‘negative’ stamps.  In our Mix It Up thread on SCS one of my friends purchased a beautiful negative butterfly swirly stamp and she was stumped as to how to incorporate it onto a card.  I love the look of the negative stamps so I thought, lets give it a try and see what I can come up with!  I stamped it in white and then tore it around the edges.  I attached it to a piece of fabric paper that I’d also torn and then curled the edges.


After I’d attached it to the card I didn’t like the look of just the small piece of black fabric paper around the stamped image, so I grabbed another piece of fabric paper and tore it to try and fill up some of the red ‘space’ I had that I wasn’t liking too much.


To this bigger piece of black I took a bamboo skewer and curled the corners on three sides to give it a bit more of an ‘old world’ feel to it.


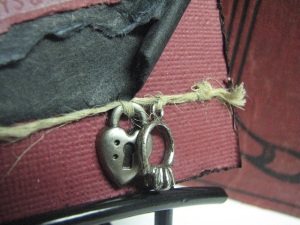
After I looked at the card for a bit I thought, this could be used for an anniversary card and I’ve had that ring charm for a long time, so I paired it up with a heart charm and tied that to some cord and attached it to the bottom of my card.


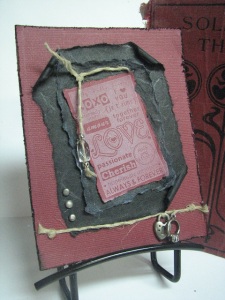
So hears what the whole card looks like.  I distressed the edges of the card and then inked it lightly with black.  I added three pewter looking brads to the one corner and that was it…..card done!  I’ve been using so much ribbon and bling lately that I kept wanting to go grab some, but this card just wasn’t lending itself to any of that, so simple it stayed! 


I have a bunch of SU cards I’d made the night before we left on our vacation and I’m going to try and get them downloaded tomorrow night and then I’m pretty much caught up as far as uploading any cards I’ve made. 

Thanks so  much for stopping by…….I missed you my blog friends!!! 

Huggss,

Yvonne   😉


Mixing It Up with Clean and Simple??

Standard

Hello blog world friend.  Today is the start of another week of our Mix It Up! challenge.  The lovely and talented Donna is hosting this week and did she choose another doozy for us!  This one may prove to be a bit of a challenge for me.  Her rules this week is no layers allowed on the card and no embellishments and only two colors of ink!!!  Seriously??!!  I grabbed a couple of my stamps, a couple of stamp pads and came up with this!


I stamped my hearts and sentiment on a piece of paper and cut around the images.  I attached the two images to the front of my card with removeable glue dots and stamped my script text stamp all over the front of the card using my black Close To My Heart ink and the stamp is from my Hot Off The Press Delicate Patterns set.  I removed the two images, and stamped them again right onto the spaces on my card…..easy peasy. The images are from a Stampology set I have called Love Thing and they’re stamped with my Cranberry Close To My Heart ink.   I decided it just needed something else so I took my Creative Memories distress tool and distressed the edges and then inked them.  I dont’ mind this at all and I only had to make two of them to get it to work!!!


This is going to be a fun week I think!  I may have to see if  I can pump another one out yet tonight……


Huggss,

Yvonne  😉


Monochromatic…..it was harder than I thought!!

Standard

Hello to my blog friends!  I hope you had a great weekend!  I didn’t get as much time in as I thought to play in my therapy room, but that is okay.  I was able to make a card to play along in the Mix It Up! challenge thread.  Ashdale (a.k.a. Lisa) started the thread where we have a different host each week and there are pretty much no rules……kinda. 😉  You really should pop on over…..we have allot of fun there.  So, this week we have the wonderful Muscrat (a.k.a. Kathy) hosting and she brought us a doozy!  Our challenge was to create a monochromatic card, right down to any and all embellishments used, ink, paper, etc.  I love the look of the monochromatic cards and I really thought this one was going to be easy…..pfft…..ya right!!  Me and my bright ideas decided I’d do a white card….pretty simple…..I have lots of white paper, white ribbon, white pearls…….but white ink for a sentiment on white paper…..ya, never thought that one out so well….lol. 

I made a 5×5 card and used paper from my Recollections cardstock paper and the Precious Metals pack.  I love the shimmer of this paper and thought it would work great for a monochromatic card.  I ran a stip of it through my Cuttlebug and used my Swiss Dots folder.  I also cut out a doily using my Close To My Heart Art Philosophy Cricut Cartridge…….have I told you how much I LOVE this cartridge??  😉  Okay, maybe a few times.  That beautiful lace flower is from a strip of lace my mom and I purchased when I got married 32 years ago.  Neither one of us can remember why we bought it anymore, we never used it, and I’m sure glad now we didn’t and that mom found it and cut some for me to use too!!  The front of the flower where you see the pearl drop is actually open and filled with a little bit of cotton.  That’s how we bought it…..it’s just beautiful in real life.


I did actually figure out what to do for my sentiment, I used the white embossing powder, from Stampin’ Up!, that our hostess with the mostest gave me in my Phyced Valentine package over in the Secret Valentine thread.  I was very lucky to have her as my Secret Valentine and she sent me the most beautiful package…..I think I drooled all over it for a day before I dared to take anything out of it to use.   So ya, there is my sentiment.  It actually shows up pretty good in real life and says “Love is spoken here.”  The sentiment is from my Close To My Heart Treasure Life stamp set.  I use that set allot as it has some very nice sentiments and flowers in it.  The ribbon is from our local Dollar Store again.  I’m very lucky they have a half decent scrapbooking section here or I’d be hooped for any supplies at all!!


Here’s a closer look at that awesome doily die cut from my CTMH Art Philosophy cartidge.  I cut it out at 3.5″ and added some little butterflies I punched out using my Creative Memories butterfly punch.  I added some pearl drops to the body of the butterflies.  


So, here’s a view of the whole card.  I added a grouping of pearls on the corners of the cardstock that was embossed with the swiss dots.  These pearls are from Close To My Heart and come in a package of 36 in four sizes.  I really like them.  I also used a pearl swirl  in behind the lace flower and I’m not sure where that was from as I’d thrown the packaging out…..ooppsss!!   There you have it…..my version of the monochromatic card!  I hope you enjoyed it and thanks so much for stopping by!

Huggss,

Yvonne  😉