Category Archives: Thank You

Revisiting my card making skills…

Standard

Holy cow…..it’s been ages since I sat down and made a card!!  I’ve been so involved in my new love of Mixed Media that I haven’t given my cards a thought in some time.  I did get together with my Stampin’ Up! group this past month after taking the summer off and it felt good to create on these small canvas’ and get some cards back into my stash!  This card is for a challenge over on the Splitcoast Stampers (SCS) site that I also haven’t visited in some time.  I’ve been nudged a few times by my old SCS buddies to get my butt in gear and get posting to this particular challenge thread and then a couple of my Mixed Media friends also put up the challenge so I figured….why not!!  I used supplies from a lot of different companies on this one!

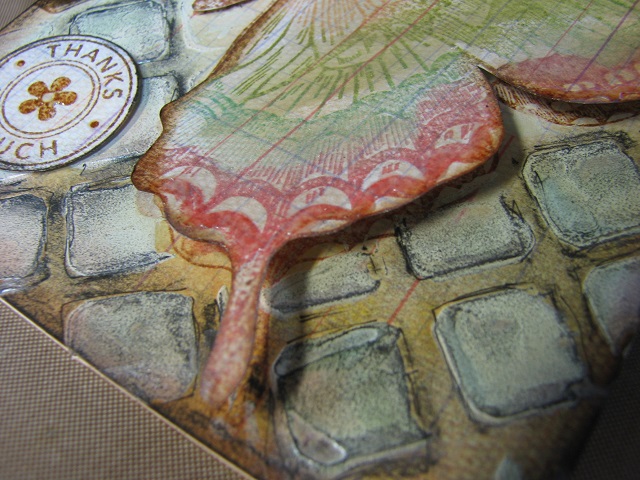
The challenge for this weeks Mixability was to use grid-lines of some sort in your project.  My grid-lines are on my background paper which is from Prima’s Sunrise sunset collection and looks like a ledger sheet.  I stamped my Stampin’ Up! Swallow Tail butterfly onto the card front and then again onto the same  ledger sheet paper in order to cut it out and pop dot it up for some dimension.  I inked the Butterfly with some of my Tim Holtz Distress inks in Vintage Photo, Dried Marigold, Peeled Paint, Broken China and Worn Lipstick.  I also took one of my homemade stencils I received in a swap I did with one of my Mixed Media friends from The Netherlands and used some of my homemade texture paste to give my background some dimension as well.  After the paste was dry I added layers of the Dried Marigold, Peeled Paint and Broken China to the lattice texture paste design to grunge it up a bit and then outlined each of the lattice squares with my charcoal pencil and smudged the lines to create the illusion of additional dimension.  I stamped the Thanks So Much sentiment using a stamp from my Stampin’ Up! Riveting set and pop dotted it up as well.  I outlined the edge of the card with my charcoal pencil as well and smudged it in.  I then took some of my Close To My Heart Create-A-Shade Pear paint and applied it to the wings of the butterfly to add some shimmer to it.  The shimmer doesn’t pick up in the camera at all, but I love the look of it! I also added some Close To My Heart Liquid Glass to the outside edges of the butterfly wings.  Here’s the card:

IMG_2349


Here’s a close up of the lattice texture stencil:

IMG_2350


So, there it is!!  A mixed media card!  Go figure.

Thanks so much for checking in. To my Canadian friends, have a fantastic Thanksgiving!

Huggss,

Yvonne

Live Inspired….Love You….Thank You….Happy Birthday….

Standard

We were at the cabin a few weekends ago and I was in a more CAS mood.  I usually like to distress and mess up my cards…..I went with a more of a clean look and not allot on the cards.  I was on a roll and made a few of them (and I thought I’d save you some email space and post all four of them in one post…..lol):


How ’bout that little pop of orange??  I used one of my swirl stamps which is from a set that I believe was the Martha Stewart swirls set (but I honestly don’t remember for sure) and stamped onto the bottom of my card base with my versamark stamp pad.  (love that stamp pad!!)  I added the word paper strip which is from a Making Memories paper called Brun Antique Dictionary.  I found this 12 x 12 paper in a pack of 25 of the same two-sided sheets and just fell in love with it!!  This is going to be soooo versatile and I know I’ll use it allot (as you’ll see with these cards….lol).  The cute bird pair is from my Inkadinkado stamp set called You are a True Friend and was colored in with my Tim Holtz Peeled Paint Distress Ink.  I also added another swirl to the printed DP which was stamped in Tim Holtz Dried Marigold Distress ink.  The ‘Live Inspired’ was taken from a portion of a Close To My Heart stamp from the set with the same name and stamped and edged in Rich Cocoa Memento ink.

This card also uses that very cool Making Memories Brun Antique Dictionary paper.  The flowers were made from two different stamp sets – one using a stem and leaf stamps from a set I’ve had forever and don’t even know who it’s made by. The flower is from a new set I just got from Stampin’ Up! called ‘Faith in Nature’.  I LOVE this set and I know I’ll use it allot.  I sponged the flower portions with some Tim Holtz Dried Marigold and Antique Linen Distress ink and also inked the edges of the printed DP with the Dried Marigold and some Rich Cocoa Memento ink.  The sentiment is taken from a portion of a stamp from my Hot Off The Press stamp set called ‘Matching Borders & Focals’.  It was stamped and edged in the Memento Rich Cocoa ink.   The lace strip was attached under and was colored using my Tim Holtz blending tool and my Antique Linen Distress Ink.


This was a quick and fun card to put together.  That pear stamp is a new fave of mine from  my Stampin’ Up! Faith in Nature set.  I stamped it onto a plain piece of cream-colored cardstock and inked it with some Tim Holtz Peeled Paint and Dried Marigold Distress Ink and my sponge daubers.  I didn’t like the look of my plain cardstock so I grabbed one of my wooden skewers that I keep in my tool pouch and stamped it into the Memento Rich Cocoa ink and dotted it onto the paper using the flat end and the pointed end for some depth to the paper.  The sentiment is from the same stamp set and inked in the Memento Rich Cocoa.  It was matted a layered a couple of times and I punched a border in some rusty colored cardstock using my Stampin’ Up! Scallop Trim Border punch.  Added some liquid pearls and Taaa Daaa….lol


Okay, so that’s it for a while.  I’m going to be heading to a trade show this afternoon with one of my DIL’s and then I’ll be back to play.  Have a most wonderful day!  Chao.

Huggss,

Yvonne  😉


Thanks so much!

Standard

Hey there my bog friends!  I have sooo many good things going on in my life right now,…….holy cow!!  The most important right now is I have Grandchild #4 due any day now!!  I’m super pumped to meet the precious little bundle I can’t even tell you!! 

I was playing around with some of my stock pile of embossed cardstock and came across a card in one of my cardmaking magazine that sent me in this direction.  It’s just a tiny card measuring in at 4 x 4, but I think packs a bit of a punch for it’s size! 


I really like the pop of color the teal brings to the card!  And I have a confession to make…..I’ve had this Baker’s Twine forever, and this is the very first strip of it I’ve ever used……geesh!  Seriously?? lol.


‘Thanks So Much’ sentiment came from my Fiskars ‘So Much Thanks’ stamp set.  I really like how this little card turned out.

Check out the beautiful painted box in behind my card.  My very talented Mother painted that quite a few years ago and I absolutely love it. 

Thanks so much for stopping by again for a peak…..I hope to see you soon!!

Huggss,

Yvonne

Scraps…..

Standard

Here we go again my blog buddies!!  So this weeks challenge for our very fun Mix It Up challenge is being hosted by Lynn.  Now she has challenged us to make a card only using scraps……now normally this is a challenge I love to dig into as I have ALLOT of scraps!!  But when you’re at the cabin, and the only scraps you have are from the two cards you’d just made…..hmmmm.


Okay, so here’s the scraps from my last two cards.  I had the sheet of cardstock that my swirls had come from, so I fussy cut around the negative holes to make a new swirl.  I had the first Faux Letterpress sheet I’d done that I didn’t really like and the left over Wax Paper Resist sheets.  I’d made a flower earlier that I’d played around with using some of my mulberry paper and hadn’t used on my first two cards.  I also had a tiny little flower as well.  I had one very small piece of lace and a second sentiment that I hadn’t used because I decided on a different color for my first card.


Here’s how I used the sentiment and the small piece of lace and tiny flower.  I also used up the rest of the swirls I hadn’t used on the second card I’d made.  I’d taken the first Faux Letterpress sheet I’d done and tore it and distressed the edges.  I inked the distressed edges with my Tim Holtz Dried Marigold and Frayed Burlap Distress Inks.  I also took one of the left over sheets from the Wax Paper Resist technique, tore it to attach to the front of the other embossed sheet.  I distressed it and inked it with the Frayed Burlap.


So, here’s the whole card.  I attached the mulberry flower that I’d inked with the Dried Marigold Distress Ink and I also cut around the negative portion of the flower I’d punched for the tiny flower I’d used on my sentiment.  Not sure about this one…..lol!!!

Huggss,

Yvonne  😉 


Wax Paper Resist

Standard

Hello blog friends!!  It’s been a while…..getting caught up once again.  I have a couple of cards to post for some challenges over in the Mix It Up thread over on SCS.  Hubby and I are up at our cabin for the weekend and enjoying the piece and quiet that seems to be up here that you can’t find at home…..why is that I wonder….lol.  So last weeks challenge on our Mix It Up thread was to create a background using only inks.  I chose to try the wax paper resist technique using one of my Tim Holtz Postmarks embossing folder.


I took a piece of wax paper, embossed it and placed it between two pieces of glossy cardstock.  I took my iron and put a piece of paper towel over the cardstock so I wouldn’t get any wax on my iron.  I pressed the embossed wax paper in order to transfer the waxed embossed pattern to the glossy cardstock.  Check out all the deets for this fun technique on the resource page on SCS right here, Wax Paper Resist.  I inked over the cardstock with my Tim Holtz Weathered Wood Distress Ink to bring out the image transfer from the wax paper.  How cool!  The sentiment was stamped in Tim Holtz Broken China Distress Ink and the edges were inked with the Peeled Paint.   My sentiment is from my Close To My Heart set called A Little Thanks.


My butterfly was a die cut my friend Lynn from SCS sent me quite a while back so I’m not sure which die set it’s from.  I inked it in Broken China and the Peeled Paint inks and adhered it with a glue dot over another die cut border from Lynn. The border die cut was white and I inked over it with my foam blending tool with the Weathered Wood Distress Ink.  I’ve been hoarding them for quite a while now and decided it was time to start using some of my treasures.  I love this border die cut and may have to find out which one it is…..it’s very nice.  I added some bling to the body of the butterfly and some for attena.  I don’t know if you can really see the subtle difference in the pattern on this picture, but because I ironed the embossed wax paper between two pieces of  glossy cardstock, both the positive and negative images transferred onto the sheets.  I cut each sheet into four and used two pieces from each sheet to attach to my card front.  Made for a very subtle design.  I think this shows a bit better on the full card view below!


So, there you have it…..add a bow, some bling and it’s a done deal!  Thanks so much for dropping by for a look see…..onto the next card!!

Huggss,

Yvonne  😉

Loving my CTMH Art Philosophy Cricut Cartridge!!!

Standard

Hello again my fine friends!!  I’ve managed to get spot #2 completed……my 3×3 Thank You cards and I love how these came out!!  I came across an example of this card in the new Close To My Heart catalogue and instantly thought this would be a cute little card.   Here are the elements I started with to put this card together!

I used paper and cardstock from my CTMH Miricle Level 2 Paper Packet and from my CTMH Grace Level 2 Paper Packet.  The 3×3 card, the square tag, the small rectangle tag and the butterfly were all cut out using my Close To My Heart Art Philosophy Cricut cartridge.  My little flower was punched using my little Marvy Uchida flower punch and the strip of blue was just cut from a piece of cardstock.  I used my Tim Holtz Vintage Photo Distress Ink to ink around the edges of the  square and rectangle tags and the flower.  The card, the rectangle tag and the flower were all cut/punched from the Colonial White cardstock, the square tag was cut from the Bamboo cardstock, the butterfly was cut from a piece of the patterned B & T Duos and the thin strip was cut from the Twilight cardstock.

The finished product turned out very cute and again……the bling just finishes it off!!  Our local Dollar Store has quite a nice little scrapbooking section and I get allot of my bling sheets from there.  So here is my finished product……..

I really like the color combo of this little card.  The sentiment is stamped in my TH Vintage Photo using a sentiment from my Paper Wishes Tiny Words and Images set.  I use this set so much!  Paper Wishes is an on-line store that carries a TON of stuff and has some really cute little stamp sets.  I may have one or two of their sets……

 As you’ve probably noticed, I’m not married to any one comapny for my card making supplies.  I have stuff from Close To My Heart, Creative Memories, Stampin’ Up!, my local Dollar Store, and a ton of odd’s and end’s paper from all sorts of companies.

Now…..onto another project.  That’s it for now, and we’ll see if I can get a couple more of my swap spots done….back to the creative grind!!