Monthly Archives: February 2012

Hawaii…..can I go back??!!

Standard

Hello blog friends…..I figured I’d best post a few pictures of our recent trip to Hawaii.  We were on the Big Island – our first time to Hawaii!!  It was very beautiful there and I loved the sun and the beaches!!  Being able to watch the hump back whales out in the ocean and experience the sea turtles on the beach sunbathing beside the rest of us……although they have very strict rules about how close you can go up to them, so zoom on the camera sure helped!  The flowers…..oh my!!…..gorgeous. 

Our first morning.....our friends had brought us fresh flower leis when they picked us up from the airport the evening before.

Sea turtle - we met this fellow the first day and he spent most of the day sunbathing with us.

This was what our beaches looked like most days - beautiful blue water, lava rock and palm trees

South Beach - this is where the brave clliff dive into the crystal blue ocean.


What a sunset!!


These little guys liked to hide amongst the lava rock along the ocean - a zoom lens and sitting still would get you a pic of them.


This is what $25 would buy you at the local market flower store.....WOW!!!


We had some pretty big surfs some days.....wow!


The sunset this evening was just stunning......my camera was working overtime!


Yup.....it was an ever changing sunset too.....gorgeous!!


At the end of the sunset.....some beautiful pinks in that sky


And not to be outdone, this was the sunrise from our plane on our way home....you can see the mountains up above the clouds.


So, there’s a few of my pics.  It was a wonderful 10 days….way tooo short!  Thanks so much for stopping by!
 
Huggss,
 
Yvonne  😉

Bliss…

Standard

Hey there my blog friends!!  I love brown and black together…..I like Kraft cardstock and black together even better!!  This is the third card I’ve made for the challenge I’m hosting over in the Mix It Up challenge thread over on SCS.  Check it out!!  Mix It Up.


I really like this black satin ribbon.  I also love my peg bow maker that I made myself…..very rough variation of it, but it works like a charm!!  Speaking of which…isn’t that pearl charm gorgeous?!  It’s another one of my treasures from Making Memories and their Vintage Groove II line.  I just love these little trinkets and my friend Lynn got me hooked on them when she happened to include a couple of the sets in a package she sent me a while ago.  The background on the Kraft paper is made using my Versamark ink pad and a cute little ‘craft smart’stamp I picked up in the $1.50 bin at Michael’s.  I just stamped it in a pattern on the front of the card and it made this subtle but elegant background for my card.\


Look at this border I made on the card using half pearls, rhinestones and yup…..buttons!!  Again, I saw this border idea in a craft magazine and just had to give it a try!  I really like how it turned out and I think I’ll be using it again.  I stamped the word Bliss, another little treasure I found in the $1.50 bin at Michael’s and it made by Hampton Art and their ‘studio g’ line.  I stamped it with my Versamark and then embossed it with clear embossing powder to make it pop just that much more.  I dotted the I with a half pearl and put a string of bling along the bottom….pop dotted it onto the card, and all done!!


And here’s the whole card.  I like how it turned out and I think it would make a very nice wedding card.   That’s it…..I’m going to drag my butt to bed now…..hopefully the girls haven’t all ran away from the challenge this week!!  Thanks so much for dropping by…..I love visitors and I love reading your comments!!!

Huggss,

Yvonne   😉


Button rainbow…..

Standard

Hi there my blog friends!  This is the second card I made for the Mix It Up challenge I’m hosting over on SCS.  My challenge was to use buttons on your card, but they had to actually be a component of the card and not just a button glued to the card.  How ’bout a rainbow?!!


So, here is my rainbow of colored buttons!  It took more time going through my jar of buttons that to glue them to the card…..lol.  I always have such bright ideas but never think how long it’s going to take….lol.  Again, I CASE’d this card from one of my cardmaking magazines. 


This is a cute little stamp.  It’s one out of my Stampology ‘Travel’ set and I thought it fit perfectly with my button rainbow.  I just freehanded the clouds, cut them out and then pop dotted them to the card for dimension.


Here’s the whole card.  I thought it was a really cute, simple, bright and cheery card.  The only real color is from the buttons.  I colored my little sun in using my Tim Holts Distress Inks in Mustard Seed and Dried Marigold with my Stampin’ Up! Aqua Painter pen.


I can’t wait to see what the girls come up with.  I know once they put they’re thinking caps on the ideas will fly……thanks so much for stopping by.  I do SOOO appreciate it and love to read your comments!

Huggss,

Yvonne  😉

Button, button……who’s got the buttons!!!

Standard

Welcome my blog friends!!!  It’s my turn to host this weeks Mix It Up challenge over on SCS.  Come on over and check it out here!!  So, my challenge to the lovely and talented ladies was to come up with a card utilizing buttons……but not just any ole’ button glued onto a card.  Their buttons have to be incorporated right into the card and become one of the components of the card…..teehee.  Here’s what I came up with for them as a sample of what I’m looking for…..


I used my buttons to form the heart for my card…..and to fill in the gaps, I glued little half pearls between them. 


For a bit of a vintage feel to my card, I actually attached a piecce of fabric to the top of my cardstock, wrapped some lace around it and accented the lace with more pearls.


Here’s the whole card!  The sentiment I stamped directly onto the fabric with my brown Memento ink.  It’s a pretty simple lay out but I really like how it turned out!  It helps when you have a Paper Crafts magazine to CASE from!!!  lol


I’m off to make another one.   I have another idea rolling around in my little head so I want to get it made before I forget what I was goingn to do!!

Huggss,

Yvonne   😉

Friendship……

Standard

Hello blog friends…..I’ve just been on a creative marathon it seems!!  My good friend Kathy over on SCS hosted our challenge for last week on our ‘Mix It Up’ thread.  We were to go to the resource section on SCS and choose something from there to do.  I hadn’t been to the resource section in a while so I was excited to see what new things I could learn.  It didn’t take me long to find just the project to work on as I wanted something to make for a very dear friend and was looking for some inspiration…..I just need to ask myself though…..why do I pick these projects to do when I have a timeline and dealine to follow and I start it the night before it’s due…you would think I’d learn……you would think.  Ya.  This is a project that’s a little bigger than a card……so I have the funny feeling this will be a long blog post……better go grab a coffee or something…..lol.


It’s an acordian ‘folder’ made from a file folder.  You can find the instructions here, Accordian File Folder.  I’ve had those swirly rhinestones with the combination of bling, pearls and raised roses for some time now and have just never found anything to put them on……this fit the bill perfectly!  They’re made by Prima and are from their “Say It In Crystals’ line.  All of the designer paper I used on this project was from Creative Imiginations and I love this paper.  It’s in the rich earth tones which I love and every piece I bought had a butterfly or butterflies on it. I bought a few of each sheet when I found it cause I knew it would be one I’d gravitate to a few times.  There is only one sheet of designer paper made by Prima from their “Moulin Rouge Collection – Celest”


Isn’t that metal butterfly gorgeous?!  It’s from a set made by Blue Moon Beads and I love this set.  It comes with 4 of these beauties, all a little different and in 4 sizes.  I used a few of them in this project.  the parchment paper sentiment is from a set made by Creative Memories.  It’s their Nancy O’Dell Collection and called ‘expressions of life’ and it is sooo versatile.  You’ll see a few of the sentiments on this little folder.  I tore around the word Friendship and then inked around the edges with my Tim Holtz Distress Ink in Vintage Photo.


Here’s the whole folder opened up.  It has 4 ‘pockets’ with little tags in each one and all decorated up!!  The whole folder was inked around all the edges and folds with my Tim Holtz Distress Ink in Vintage Photo.  I love the definition that’s created when you ink around the edges of a piece of paper.  This was allot of fun to put together……it just took a long time!!


Here’s the first pocket with the tag sticking up out of it.  The ‘tag’ I have attached to the top of this tag is a two piece set that I’ve had for so many years I don’t know where it came from anymore.  It’s a cardstock tag with an acetate sheet overlay that has light grey print on it to create the black distressed edge, the butterfly overtop of the fern leaf and the post office paris stamp on it.  The brad I used to hold it on is from Close To My Heart and from the Filigree Charms set…. (love that set of charms and brads).  The ‘jewelled’ piece up on the right hand side at the top of the main tag is from a bobby pin hair accessory I found at the local Dollar Store and just detached it from the bobby pin.  I love those hair accessories!!  The pic on the right is of the pocket itself.  that gorgeous vintage looking metal flower is from my good friend Lynn (FMcrafater) on SCS.  I finally brought myself to start using these little treasures she sent me instead of hording them and just drolling over them from time to time…..lol.


The second folder and tag.  This tag has a sentiment from the Creative Memories Nancy O’Dell collection again.  Torn and inked around the edges with my Vintage Photo distress ink.  All the tags have various strands of fibres linked through the hole in the top of the tag.  I love the look of the barb-wire scroll on the desginer paper on this tag…..


Here’a close up on the left of a beautiful little trinket my friend Lisa (Ashdale) sent me a while ago.  I love this thing and just thought it was a perfect addition to this tag.  On the right is the pocket for this section of the folder.   That little jewelled beauty on the top is another hair accessory that I just took the pliers to and detached from the clip.  The sentiment is from my Creative Memories set again and the cameo is from a set made by Making Memories and their Vintage Groove II series.   Sentiment inked with the Vintage Photo too.


Section #3!  The tag has another parchment sentiment from my Creative Memories set and I’ve attached another one of my metal butterflies.  I also added a pearl scroll from Want2Scrap and their ‘Say it with Pearls’ line.  I also added three pearl drops on the right hand top corner from Making Memories.


There’s a close up on the left of the sentiment, pearl swirl and that wonderful little metal butterfly.  On the right is the pocket for this section of the folder.  Three more pearl drop hearts for the top right corner and another embellishment I’ve had for some time and I’m pretty sure it was a Prima set.   There’s more of that designer paper with the barb-wire swirls and butterlfy on it.


Here’s the last section of the folder and my favorite sentiment!!  Another one of my metal buterflies and some swirly bling on the bottom of the sentiment, which was inked with my vintage photo, peeled paint and broken china.  I love how these inks blend together so well and make for a subtle hue on the parchment paper.


Man I love those butterflies!!!  The pocket for this last section has a tag that I pop dotted up and again, from a sheet I’ve had forever and don’t know where it’s from.  The beautiful butterfly on this pocket is from a sheet of them I picked up from Walmart and I don’t have the outer packaging!!!  Oh well……


So, there you have it.  Hubby apparantely thinks I need to feed him now, so I’m off to throw some chow into the oven.  Thanks so much for popping in……I love to have you!!


Huggsss,

Yvonne   😉

Love Birds……ahhhh

Standard

Round three coming up!  This is such a cute card…..I just love all the little details on this one.


Aren’t those two little birds just too cute!!!  They lend themselves to be very fitting for so many different occasions!!  Valentines, a wedding card, anniversary, birthday, just because, thinking of you…..etc., etc.!  So versatile they are.  And I love the embossed frame…..it’s one of the folders in the Designer Frames set of Textured Impressions Embossing Folders Set..  This oval folder fits the Extra-Large Oval punch (which the birds were stamped onto).  I really like the circle details around this embossed frame…..sets it off so nicely.


I love the little hearts!  Now I forgot to ask ‘Cutter’ (my SU! Demo’s nickname….she’s awesome!!) which folder this is, so I went searching through the catalogues and I’m pretty sure it’s one of the Letterpress Plates called Heart Pressed….so I’m going with that.  She’ll correct me if I’m wrong….lol.  (and only because I just emailed her to ask her.  😉  )  Edit:  lol……nope, I was wrong…..it’s one of the folders from the Adorning Accents sets.


See…..cute card isn’t it?!!  Don’t you think my little photo helper is just the best?  It’s a bear hubby gave me quite a few years ago that was attached to a balloon boquet for Valentines Day……there was a story behind me getting the balloons, because anyone who knows my hubbywill know he doesn’t do things like send balloon bouquets….lol.  Attached to the cute little bear was a little card and on that card was a poem he’d written for me.  Now, you’re probably going…..ahhhh…..he wrote you a poem??!!  How romantic……ya.  This is what the poem said:  “Roses are red, violets are blue(which, I agree, was a good start to the poem).  It went on to say….. I need brownie points, for a new Ski-Doo…..yup, that’s right.  LOL LOL LOL.  He’d had a minor argument with a tree root on a ski-doo trail and his sled kinda lost and bent his ski…hadn’t told me yet, so he thought this would be a good way to break the news to me…ya gotta love the man.  He is inventive….and it totally worked!!  Yup, that’s right, I can be bought with a sweet little bear holding a sign which says “I love you this much” and a balloon bouquet….lol

 That’s it for tonight…..I’m off to make an important phone call to a special friend……thanks for stopping by and checking out my cards!  I soooo appreciate it!!

Huggss,

Yvonne    😉

It’s a pool party!!!

Standard

Hello again…..did ya miss me??  teehee.  Don’t you just love the names of the papers from Stampin’ Up!?  This card is one of my new favorites.   Yes, I go through favorite stages…..where I’ll make a card and then won’t want to give it away cause I like it too much…..sooo silly!!  But anyway, here is my latest fave….

The colors are slightlyoff in the pic I think, but I love the combo of  the Pool Party with the Wisteria Wonder.  The Wisteria Wonder is a sort of purple/grey color andn I just love it!  The strips of ‘ribbon’ looking paper was embossed with the Vintage Wallpaper embossing folder and then cut into strips and the ‘V’s’ cut out to make the strips look like ribbon.  Then a strip of Wisteria Wonder was added to the top of the embossed strips and topped with another strip of the Pool Party cardstock that had been edged using the Pinking Hearts Border punch……I really like that border punch…..wish list!!  Then my fave part of the card…..the gorgeous Wisteria Wonder Ruffle Ribbon……this ribbon is soooo cool!!  I just love the ‘wrinkled’ look of the edges of it.


Here’s a close up of the ribbon and the border design.   LOVE IT!!!


Isn’t it just a beautiful card??!!  The Happy Birthday sentiment is from the Happiest Birthday Wishes two part stamp set.  I love this set and it’s got so many and varried birthday sentiment stamps…..very cool set.


I should have left my favorite card for the last one…..tis okay though because the next card is very, very cute too!!  Stay tuned…..more to come. 

Huggss,

Yvonne  😉


Soft Suede…..love the sound of that…

Standard

Well my blog friends, get ready for a few emails to be filling up your in-box tonight.  I have to upload my cards that were made at the last Stampin’ Up! Demo our group had.  I was late arriving as it was the night before we left for Hawaii, so my wonderful SU! Demo (her nick name is cutter…..don’t ya love that??!!)  put them together for me…..but I have to show them off anyway! 


Don’t you just love those two colors together??  The Soft Suede cardstock and the So Saffron satin ribbon….mmmm hmmm….yup, those colors work for me. 


Check out this border die cut!!!  I love it!!  It’s the new Edgelits and they have a matching stamp set to go with them…..notice the dotted line…..that’s the stamp that matches the edge die.  It make such a nice focal point for the card.


Here’s the whole card…..and my cute little bear…lol.  I don’t know if I have more fun posting the blogs or finding the things to use as props for my pics…..lol. 


Okay….off to post card #2…….can you feel the suspense??  lol lol

Huggs,

Yvonne  😉


Trying to get back in the groove!!!

Standard

Hello my long lost blogging friends!!!  I was away on a holiday to Hawaii and oh my goodness!!!  Beautiful is all I can say!  It was our first time there and it did not dissapoint.  I took a TON of photos and I’m hoping to sort throught them this weekend and I’ll post some of my fav’s for ya!  I tell you, I sure missed this blogging stuff while I was away and I think the next time I go off on a holiday, I’m going to have to try and do some blogging while I’m away just so I stay in the groove…..geesh!!

 So, I’ve been trying to get back in the groove and was playing in my craftroom this evening and did a card up that I still can’t decide if I like or not.  I keep looking at it and thinking it needs something…..I have no idea what that something might be, but I finally gave up…..lol


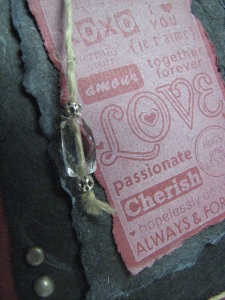
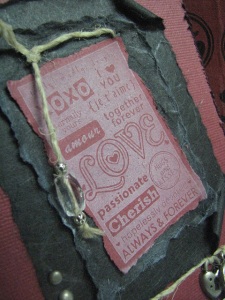
I was playing with some cord and was thinking (as I do actually do that from time to time), instead of making a hat pin to put on the card, why not string the beads onto the cord and use that as one of the embellishments for the card……I kinda like it!!  The stamp is one from a set of four from Inkadinado called ‘In The Words’ and they’re all ‘negative’ stamps.  In our Mix It Up thread on SCS one of my friends purchased a beautiful negative butterfly swirly stamp and she was stumped as to how to incorporate it onto a card.  I love the look of the negative stamps so I thought, lets give it a try and see what I can come up with!  I stamped it in white and then tore it around the edges.  I attached it to a piece of fabric paper that I’d also torn and then curled the edges.


After I’d attached it to the card I didn’t like the look of just the small piece of black fabric paper around the stamped image, so I grabbed another piece of fabric paper and tore it to try and fill up some of the red ‘space’ I had that I wasn’t liking too much.


To this bigger piece of black I took a bamboo skewer and curled the corners on three sides to give it a bit more of an ‘old world’ feel to it.


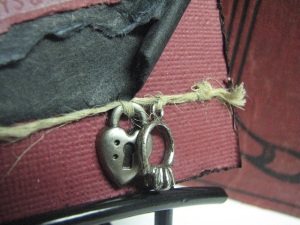
After I looked at the card for a bit I thought, this could be used for an anniversary card and I’ve had that ring charm for a long time, so I paired it up with a heart charm and tied that to some cord and attached it to the bottom of my card.


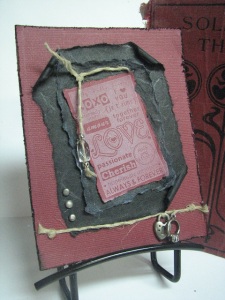
So hears what the whole card looks like.  I distressed the edges of the card and then inked it lightly with black.  I added three pewter looking brads to the one corner and that was it…..card done!  I’ve been using so much ribbon and bling lately that I kept wanting to go grab some, but this card just wasn’t lending itself to any of that, so simple it stayed! 


I have a bunch of SU cards I’d made the night before we left on our vacation and I’m going to try and get them downloaded tomorrow night and then I’m pretty much caught up as far as uploading any cards I’ve made. 

Thanks so  much for stopping by…….I missed you my blog friends!!! 

Huggss,

Yvonne   😉


Another frenzie!!!

Standard

Hello Blog friends!  🙂  There’s been another frenzie of cardmaking happening again with our CAS (Clean and simple) challenge for this week.  No layers, no more than two colors of ink, no embellishments of any kind…..how hard could this be??!! 

I started out with a dark brown piece of cardstock from one of my Recolection cardstock packages from Michael’s and then grabbed my Versamark stamp pad.  I love this stamp pad and don’t use it near enough.  It’s not a color…..what it does is change the color of the cardstock you stamp it on to one shade darker.  Clever now aren’t I??  So technically, my images aren’t stamped in a color at all…..it’s like a watermark.  So that left me with my two colors of ink I could use.  This swirly flowery stamp is from Inkadinkado.  I grabbed my Ranger Distress Inks in Peeled Paint and Fired Brick.  I used my Stampin’ Up! blender pens and colored in just my flowers and my leaves.  I love the way the Distress Inks leave a very subtle color behind.

Aren’t these little butterflies cute??!!  This single little butterfly is part of a two sheet set of stamps from Close To My Heart called Sentiments.  I love this stamp set as it has soo many little sentiments that can be mixed and matched.  And a whole bunch of little images to use too…..love it!!  I colored them in with my Peeled Paint Distress Ink.  The little dotted trail for the butterflies was done using an embossing pen I have that works like the Versamark stamp pad…..just changes the color of the cardstock….teehee!!!

Here’s the sentiment I used on this card.  I love this one and found it in the $1.50 bin a Michael’s a while back.  It’s a Hampton Art Studio G stamp.  I stamped it in the versamark as well.

So, here’s the whole card.  I really quite like it with the subtle color mixed in with the images.    These cards would be allot cheaper to mail than my layered ones!!!

That’s it for tonight.  I’m off to get some cards bundled up to send to my mom and then hit the hay!!

Yvonne  😉